Creating Cover Pages with Castelle Cover Page Editor
 Other Related Topics...
The best way to make a cover page using the Castelle Cover Page editor is to modify one of the existing .cce template in the Cover Page Templates folder.
Any FaxPress user can create a cover page template: no special privilege level is required.
Creating a Castelle Cover Page Editor cover page is a four-part process:
|
1.
|
Create a cover page master with the Cover Page Editor. |
|
2.
|
Compose the cover page. |
|
3.
|
Save the cover page master to a file. |
|
4.
|
Convert your cover page master to a fax-ready cover page. |
The Castelle Cover Page Editor provides everything you need to create a cover page master, including an 8.5" x 11" base page, FaxPress keywords, text tool, drawing tools, and a conversiontofaxformat utility.
Your cover page master can include FaxPress “keywords” (substitution variables that FaxPress uses to import information from the outgoing fax onto the cover page), permanent text, graphics, imported text and imported graphics.
A heavy, dark line is used to indicate page edges. The line may not appear on monitors that use low resolution. If the lines do not appear, leave a quarter-of-an-inch for the top, bottom and left page borders and half-an-inch for the right page border.
Designation and keyword information that appear in areas of the edit box that extend beyond the page border will be truncated in the outgoing cover page.
Create a Cover Page Master
This section explains how to create cover pages using the PCL-based Castelle Cover Page Editor. Cover pages created using the Castelle Cover Page Editor support English characters only. For information on creating cover pages using Microsoft WordPad, to support the use of International Characters, please see
To create a cover page master, follow these steps:
|
1.
|
Open the by clicking on from the menu and selecting . |
|
2.
|
The will open and look like this: |
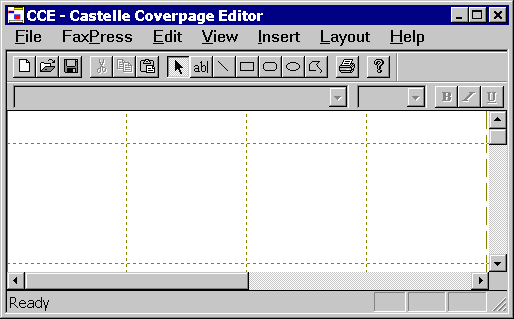
— The blank 8 1/2” x 11" page with grid lines is the “base page” on which you place elements to create your cover page. The grid lines are an aid to help you place elements on the page and will not appear in the finished cover page. You can disable the grid lines by deselecting in the drop-down menu.
|
3.
|
To add permanent text (text not affected by substitution variables) to your Cover Page, click on the menu and select the option. |
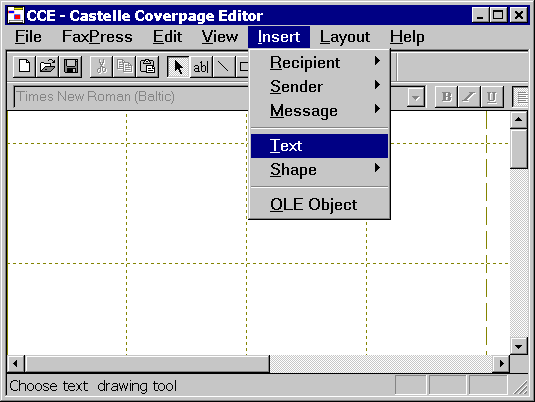
A large plus sign (+) appears on the page. This tool allows you to draw a text box into which you enter text.
|
4.
|
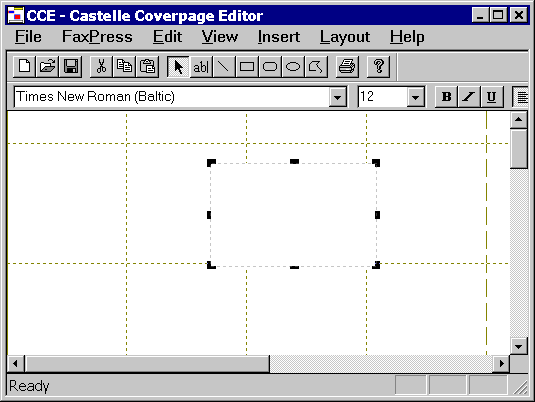
To create the text box, move the plus sign to where you want to place the text box, then hold down the left mouse button and drag the mouse to the right and down to produce a square. |
|
5.
|
Release the button. Note that the box is still selected. |
|
■
|
— You can reposition the text box by clicking and holding inside and then dragging it to a new location. |
|
■
|
— You can change the size of the text box by triggering the expansion tool along its borders. |
|
■
|
— At any time, you can unselect the box by clicking outside of it and reselect it by clicking inside it. |
|
6.
|
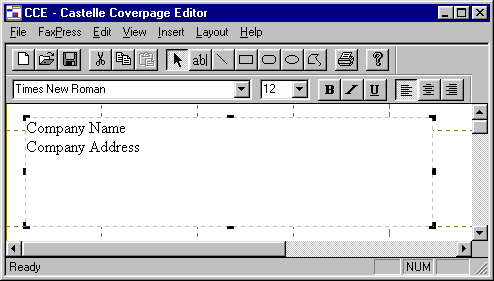
Double-click inside the box. Your cursor will change from an arrow to an insertion point symbol. Click again, and your text insertion point will be at the upper left corner of the text box. You can then enter text. Change the font, font size and other font characteristics by selecting text and using the bar. If you do not see the bar, enable in the menu. |
Importing Graphics
The Castelle Cover Page Editor allows you to import graphics in the process of creating a custom cover page. Follow these steps to import an existing company logo to a cover page created using the castelle Cover Page Editor:
|
1.
|
Save your logo in a Word document or similar application |
|
2.
|
Open the word document |
|
3.
|
Select the logo bitmap, and choose Edit>Copy. |
|
4.
|
Open the CCE and choose |
|
6.
|
This will open a window on the CCE document. Choose topaste the bitmap on the CCE document. |
Add Substitution Variables
There are numerous substitution variables that you can add to a cover page.
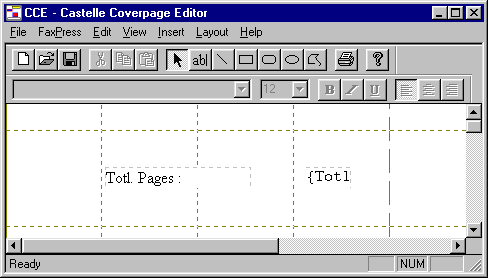
As an example, let's first add the substitution variable, which provides a count of the total number of pages the outgoing fax contains.
|
1.
|
Add the variable to the page. |
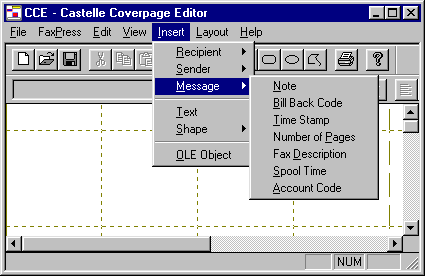
Click on the menu, select the option and then .
This will place two boxes onto your base page:
|
■
|
— The box labeled “” contains the designator for the element. |
|
■
|
— The box labeled “” will contain the substitution value. |
|
2.
|
Move the variable boxes to the desired location. When either a or box is selected, you can drag them to any desired location. To drop a box, you can click anywhere in the blank page to deselect them. Initially, both boxes will be selected. Later, you can select either one or, by CtrlClicking, both. |
You can treat a label box as any other text box by doubleclicking in it and editing the text.
|
3.
|
You can use the same procedure to add the following variables, all accessed through the menu. |
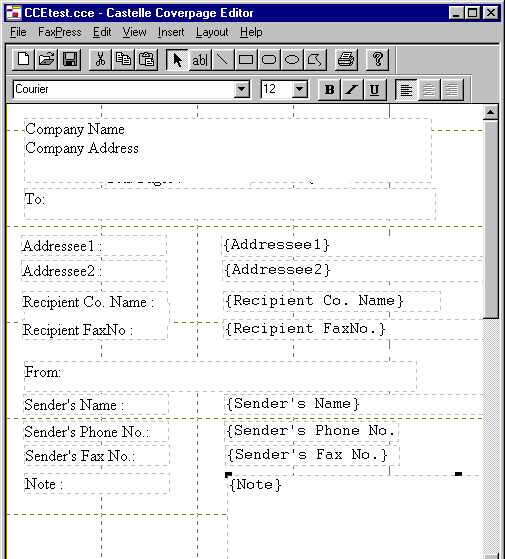
Insert Recipient Variables
|
■
|
— The recipient fax number, as entered on the dialog or as entered in the phonebook or database used to select the recipient. |
|
■
|
— The company name, as entered in the phonebook or database used to select the recipient. |
|
■
|
— The recipient voice phone number, as entered in the phonebook or database used to select the recipient. |
|
■
|
— is the recipient whose address information appears on the cover page. The other addressee's are other recipients to receive the fax. |
|
■
|
— Sender's name, the logged on FaxPress user. |
|
■
|
— Sender's phone number. |
Message Variables
You can enter a message of up to 16 lines.
|
■
|
— Bill back code, as entered in your properties field. |
|
■
|
— Time and date when fax is sent. |
|
■
|
— Total number of fax pages, not counting the cover page. |
|
■
|
— The subject line of the dialog. |
|
■
|
— Time in processing queue. |
Sample Cover Page
Following is a sample Cover Page in the process of being constructed:
Save Cover Page Master
You can save your cover page master on any available volume. The master will be saved in FaxPress format, so that it can be opened and edited in the Castelle Cover Page Editor. To save your Cover Page Master, use the menu choice to navigate to a directory, enter a name, and save. The saved file must have as a suffix.
Downloading the Cover Page to the FaxPress Server
After you have created and saved your Cover Page Master, you must download it to your FaxPress server. This operation converts and stores your cover page.
|
1.
|
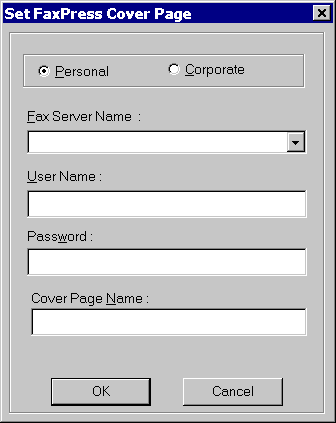
To open the screen, from the menus, select . |
|
2.
|
In the screen, specify the following information. |
|
■
|
— Click on the radio button for a personal cover page and for a corporate cover page. You must have FaxPress supervisor privilege to install a corporate cover page. |
|
■
|
— Enter the name of a Fax Server Name or use the dropdown list to select a server. If the FaxPress server you want to use is not listed and is on a different segment than your workstation, enter the FaxPress server's IP address or network name. |
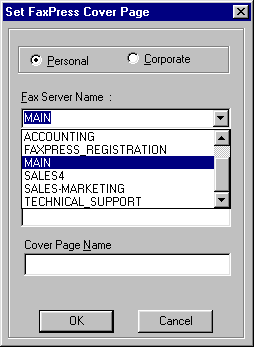
|
■
|
— Enter your FaxPress login name. |
|
■
|
— Enter your FaxPress login password. |
|
■
|
— Enter a name for the cover page. |
|
3.
|
When you click on , you will be logged into the specified FaxPress server with the specified name and password, and the cover page will be converted to fax-ready format and placed in the appropriate folder. |
FaxPress WebHelp
Last Updated: 9/12/2007
E-mail this page
|
Castelle
855 Jarvis Drive, Suite 100
Morgan Hill, CA 95037
Toll-free 800.289.7555
Tel 408.852.8000
Fax 408.852.8100
www.castelle.com
|